SSH keys that expire: short-lived access with OpenBao and Keycloak
Long-lived SSH keys pile up on servers, and nobody can tell which ones are still needed. This post shows an alternative I use: a trusted CA that signs keys for 30 minutes, with Keycloak as the identity behind it and OpenBao as the CA. It needs nothing but OpenSSH on the hosts and works on-premise or air-gapped.
Note
Terminology
OpenSSH uses the term certificate when a public key is signed. This is not a X.509 certificate, but a different format that is specific to OpenSSH. The CA (Certificate Authority) is the entity that signs the user’s public ssh key, and the signed public key is called a certificate. Certificate may refer also the metadata content of the signed key, like the validity period, the principals, the key ID, signature key, etc. I’ll be using both terms - signed key and certificate - depending on context.
What are the benefits of this setup?
No long-lived keys on the hosts, only a public key of the CA.
Short-lived certificates, automatically renewed, tied to a single sign-on identity.
Access control is centralized in Keycloak, not on each host.
Scalable: adding or removing users does not require touching every host.
Auditable: logs show who logged in and when, based on the certificate’s key ID.
In case of a compromised signed key, the compromise has a limited time window. If the compromise is detected, it can also be mitigated by removing the trusted CA keys on the remote hosts, basically rotating the CA key in the vault and its public keys on the trusting hosts. The mitigation is only on infrastructure level, not the user level, which makes it much easier to perform quickly and reliably. OpenSSH can also block individual certificates (even by serial number) with a key revocation list (KRL, see the ssh-keygen man page), which
sshdreads viaRevokedKeys. As far as I can tell, OpenBao’s SSH engine neither generates nor distributes such a list, and neither does OpenSSH, so you would have to build it and push it to every host yourself. Short TTLs remain the main protection.
The building blocks for our experimental setup:
OpenBao (the open source fork of Hashicorp Vault) is the CA and signs my public key.
Keycloak is the identity provider. It knows who I am and which roles I have. We will define a new client role to enable key signing in OpenBao.
OpenSSH already supports all of this. No agent, no extra software on the hosts, just a few lines of
sshd_config. This can be automated with Ansible, but that is not the focus of this post.
This post can also be used in conjunction with Hashicorp’s Vault.
Why signed keys?
There are two main benefits of using signed keys: scalability and security.
Scalability
With plain keys, every host has a list of public keys. Adding or removing a person means touching every host, and nobody can tell from the list whether a key is still needed.
With certificates, the remote host holds one thing: the public key of the CA. Whoever presents a key that the CA has signed, with a valid time window and an allowed principal, gets in. Access is then decided where the identity lives, not on each machine (in the OIDC provider, Keycloak in this case).
When a person should get access revoked, it is enough to remove the role in Keycloak. The next time the person tries to get a certificate, it will fail and they will not be able to log in anymore. No need to touch every host.
With the abstraction layer of principals, local accounts are detached from the ssh key. See below for details about principals.
Security
A stolen 30-minute certificate is a small problem, a stolen key from a year ago can be a big problem.
The certificate of a signed key contains a time limited validity (ttl: time to live). The CA can decide to sign the key for a short time only (like 30 minutes).
The certificate also contains a serial number, which makes it possible to correlate logins with the signing event. In this post’s setup it is even possible to know who requested the signature, because the requesting user (person or bot) authenticates with Keycloak.
The CA: where the trust comes from
Everything rests on one private key, the CA key. Whoever holds it can sign access to every host that trusts it. So the question is where it lives. In this setup the OpenBao vault is the CA.
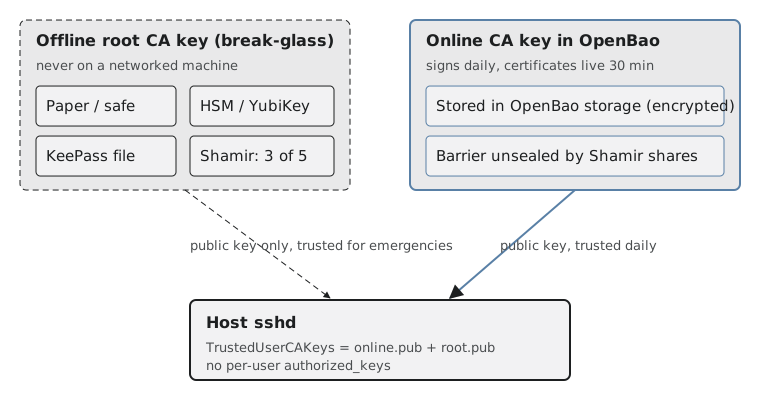
Two keys: an online one that signs daily, and an offline one for emergencies.
Note
Certificate chains
An important detail: OpenSSH CA keys have no chains, unlike X.509/TLS certificates.
It is not possible to derive intermediate certificates. The host simply has a list of trusted CA public keys
(TrustedUserCAKeys). Still we can mimic (to some extent) the behavior
of a certificate chain by using multiple keys: an online and one offline “root” key.
Scale the number of trusted offline keys to your paranoia level.
An online CA key in the vault that signs the daily certificates. It is generated inside the vault (
generate_signing_key=true).An offline CA key that is only a break-glass key. Its public half is trusted by the hosts too. If the online CA key is compromised or the vault is down, you bring the offline key out, sign a certificate by hand, and get in. It lets you remove the compromised online key without locking yourself out: trust both, swap, then remove the old one on each host (configuration management is encouraged).
How to keep the offline key(s) is a matter of tradeoff between paranoia and convenience:
On paper (printed key, in a safe or under grandma’s pillow): cheap and robust, can last centuries, not for productive use - or is it?
On an HSM or YubiKey: the key never leaves the device, signing happens on it. Nice and practical, fits corporate security policies, but expensive (the YubiKey is the poor man’s version, and not recommended in regulated environments).
A KeePass file with a strong password, stored in a safe place.
Split with Shamir’s Secret Sharing (for example 3 of 5 shares), distributed to different people or places. No single share reveals anything, any three reconstruct the key. Can be implemented with mentioned storage methods.
Preparing OpenBao for SSH signing
OpenBao comes with a built-in SSH secret engine. It can generate a signing key, and it can sign public keys. The signing key never leaves OpenBao, and the public signing key can be read out and trusted by the hosts by deploying them onto the remote hosts. Remote hosts can use the public signing key to verify incoming signed keys for their authenticity.
# once, on the OpenBao side
bao secrets enable -path=ssh ssh
bao write ssh/config/ca generate_signing_key=true
Note
Configuring OpenBao for SSH signing requires elevated privileges. A temporary root token can be generated from the unseal keys and dropped after the configuration is done. See also the OpenBao documentation for details.
Next comes the SSH role. It defines what values OpenBao will put into the signature.
The policy created further below allows signing on
ssh/sign/admin, and this role is what lives behind that path:
bao write ssh/roles/admin - <<'JSON'
{
  "key_type": "ca",
  "allow_user_certificates": true,
  "allowed_users": "infra-admin",
  "default_user": "infra-admin",
  "ttl": "30m",
  "max_ttl": "1h",
  "key_id_format": "{{token_display_name}}",
  "default_extensions": {"permit-pty": ""}
}
JSON
allowed_usersis the list of principals that may appear in a certificate signed through this role (comma separated, no wildcard here on purpose). Asking for anything else fails at signing time.default_useris used if the request contains novalid_principals.ttlandmax_ttlkeep the certificates short-lived.key_id_formatwrites the authenticated OpenBao identity into the key ID, which is what shows up in thesshdlog later.default_extensionsgrants a terminal (permit-pty). Without any extension, the certificate is valid but gives no interactive shell.
Planting the trust on the remote host
The remote host (the one that grants access to ssh connections) needs three things. All of them are public information:
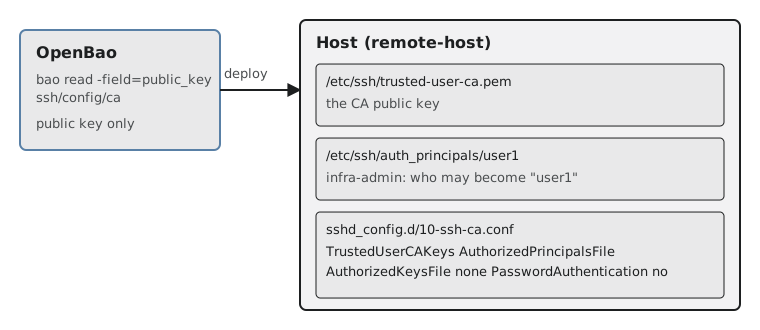
What an Ansible role puts on the server (or any other deployment mechanism, which can
be also a manual scp for testing).
The CA’s public key we already covered above. What is the principal file? It is a simple text file that maps local accounts on the remote host to principals that are allowed to log in as them. There can be one file per local account on the remote host with the list of allowed principals, which are provided in the signature during ssh login. More on that later.
The drop-in for sshd is a small configuration snippet that points to the CA public key and the principal file(s).
It is basically the configuration for the ssh daemon to trust the CA and to check the principals. Details below.
How to get the CA public key from OpenBao? The bao CLI can read it:
bao read -field=public_key ssh/config/ca > ssh-user-ca.pub
If you didn’t log in to OpenBao yet you can do so with:
# bao login -method oidc requires additional policies to read the public key.
# out of scope for this post.
bao login # requires a root token.
Note
Permissions for downloading the CA’s public key
Reading the public key requires permissions. For simplicity’s sake, let’s use the root token for this, but a dedicated policy can be created that only allows reading the public key. This is out of scope for this post.
On the remote host create a drop-in for sshd that points to the CA public key and a file with
the authorized principals:
# /etc/ssh/sshd_config.d/10-ssh-ca.conf
TrustedUserCAKeys /etc/ssh/trusted-user-ca.pem
AuthorizedPrincipalsFile /etc/ssh/auth_principals/%u
sshduses the first value it reads, so the drop-in must sort before50-cloud-init.conf.Always check the config with
sshd -tbefore reloading, keep a second session open, and only switch offauthorized_keys(AuthorizedKeysFile none) after the certificate login has been proven to work. I let Ansible do this and roll back the drop-in if validation fails.
Proving who I am: Keycloak, OIDC and a role claim
OpenBao does not know me. We want to delegate that to an OIDC (OpenID Connect) provider, like Keycloak. The trick is that Keycloak puts my client role into the token as a claim, and OpenBao decides based on that claim, if I am allowed to ask for a ssh-key signature.
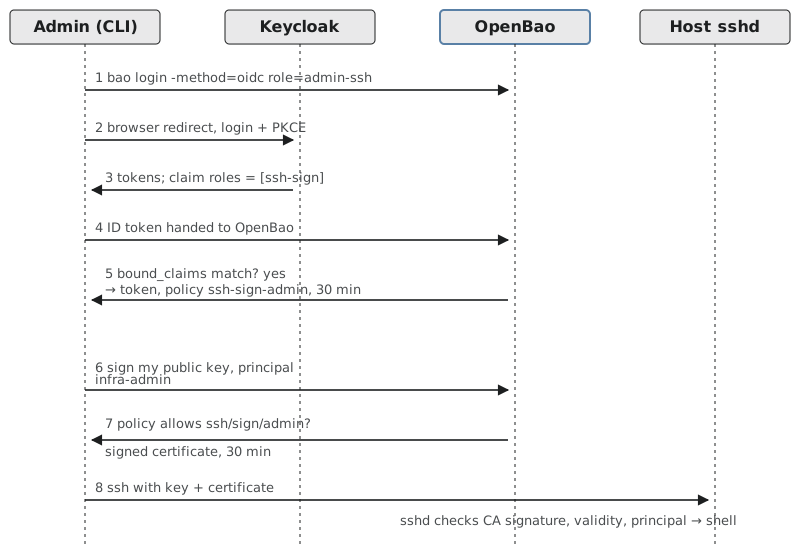
From bao login to a shell, in eight steps.
The Keycloak side needs a one time configuration (in the realm):
A client
openbao(client in this context is the OpenBao instance, it’s a client application for the oidc provider). We assume it already exists, see the OpenBao documentation for details.A client role
ssh-sign, assigned to any user that shall be allowed to sign SSH certificates with the specified principal.A mapper that writes the user’s client roles into a
rolesclaim of the ID token. This is basically a configuration of how thessh-signclaim will land in the auth token.
The OpenBao side: an OIDC auth method, and a role that only lets a user in if the claim contains the right role, and then gives them nothing but one policy. This requires elevated privileges, which can be achieved via a root token in the vault. From OpenBao v2.6.0 on it is possible to generate a root token from the unseal keys and then drop it, which is a very useful security feature in my opinion.
bao write auth/oidc/role/admin-ssh - <<'JSON'
{
  "role_type": "oidc",
  "user_claim": "preferred_username",
  "bound_audiences": "openbao",
  "bound_claims": {"roles": ["ssh-sign"]},
  "policies": "ssh-sign-admin",
  "ttl": "30m"
}
JSON

bao policy write ssh-sign-admin - <<'HCL'
path "ssh/sign/admin" {
  capabilities = ["update"]
}
HCL
This OpenBao role connects the claims in the oidc token with the ssh-sign-admin policy in the vault.
The ssh-sign-admin policy allows asking for a signature on ssh/sign/admin,
which is provided by the ssh secret store of OpenBao. If you want to support another
user group with other permissions (e.g. partitioning access to different
parts of the infrastructure), you add another Keycloak role, map it to the identity token
in the OIDC provider (e.g. Keycloak) and another policy.
Signing, and a small helper
Now we’re at the finish line. Here is how I can generate a signed ssh key on my laptop to log into the remote host:
bao login -method=oidc role=admin-ssh
bao write -field=signed_key ssh/sign/admin \
  public_key=@$HOME/.ssh/id_ed25519_bao.pub \
  valid_principals=infra-admin > ~/.ssh/id_ed25519_bao-cert.pub
ssh-keygen -L -f ~/.ssh/id_ed25519_bao-cert.pub
The key pair stays the same, only the certificate next to it
(-cert.pub) is replaced.
Now let’s setup the local ssh to use the signed key and renew it automatically
on a new ssh session. Two things are needed: 1. a script that renews the signed key and
2. a Match exec line in the ~/.ssh/config that calls the script before connecting to the host.
Here the script, put it into your home path for this example as ~/bao-ssh-cert.sh.
 1#!/usr/bin/env bash
 2# Renews the SSH user certificate from the OpenBao SSH CA when it is missing or about to expire.
 3# Logs in to OpenBao with OIDC (Keycloak) only if the current token is not valid. The key pair is reused, only the certificate changes.
 4# It requires the `bao` CLI to be installed and configured.
 5#
 6#   bao-ssh-cert            renew if less than MIN_SECONDS of validity are left
 7#   bao-ssh-cert --check    only report, exit 0 if the certificate is valid long enough, 1 if it needs renewal
 8#   bao-ssh-cert --force    renew now
 9#
10# Settings (environment): BAO_ADDR, SSH_KEY, MIN_SECONDS, BAO_SSH_SIGN_PATH, BAO_SSH_PRINCIPAL, BAO_OIDC_ROLE
11set -euo pipefail
12
13export BAO_ADDR="${BAO_ADDR:-http://localhost:8443}"
14key="${SSH_KEY:-$HOME/.ssh/id_ed25519_bao}"
15cert="${key}-cert.pub"
16min_seconds="${MIN_SECONDS:-300}"
17sign_path="${BAO_SSH_SIGN_PATH:-ssh/sign/admin}"
18principal="${BAO_SSH_PRINCIPAL:-infra-admin}"
19oidc_role="${BAO_OIDC_ROLE:-admin-ssh}"
20
21mode=renew
22case "${1:-}" in
23  "") ;;
24  --check) mode=check ;;
25  --force) mode=force ;;
26  *) echo "usage: ${0##*/} [--check|--force]" >&2; exit 2 ;;
27esac
28
29# Seconds until the certificate expires; negative when expired, empty when there is none
30seconds_left() {
31  [[ -f $cert ]] || return 0
32  local until
33  until=$(ssh-keygen -L -f "$cert" | sed -n 's/^ *Valid: from .* to \([^ ]*\)$/\1/p')
34  [[ -n $until ]] || return 0   # "Valid: forever" or unreadable: treat as unknown
35  echo $(( $(date -d "$until" +%s) - $(date +%s) ))
36}
37
38left=$(seconds_left)
39if [[ -n $left ]]; then
40  if (( left > 0 )); then echo "certificate $cert valid for another $(( left / 60 )) minutes"
41  else echo "certificate $cert expired $(( -left / 60 )) minutes ago"; fi
42else
43  echo "no usable certificate at $cert"
44fi
45
46needs_renewal=true
47if [[ $mode != force && -n $left ]] && (( left >= min_seconds )); then needs_renewal=false; fi
48
49if [[ $mode == check ]]; then
50  if $needs_renewal; then exit 1; else exit 0; fi
51fi
52$needs_renewal || exit 0
53
54[[ -f $key.pub ]] || { echo "public key $key.pub is missing (ssh-keygen -t ed25519 -f $key -N '')" >&2; exit 1; }
55command -v bao >/dev/null || { echo "bao CLI not found" >&2; exit 1; }
56
57if ! bao token lookup >/dev/null 2>&1; then
58  echo "OpenBao token missing or expired, logging in with OIDC (role $oidc_role)"
59  bao login -method=oidc role="$oidc_role" >/dev/null
60fi
61
62# Written to a temporary file first, so a failed signing does not destroy the old certificate
63umask 077
64tmp=$(mktemp "$cert.XXXXXX")
65trap 'rm -f "$tmp"' EXIT
66bao write -field=signed_key "$sign_path" public_key=@"$key.pub" valid_principals="$principal" > "$tmp"
67ssh-keygen -L -f "$tmp" >/dev/null   # refuses anything that is not a certificate
68chmod 644 "$tmp"
69mv "$tmp" "$cert"
70trap - EXIT
71
72echo "new certificate $cert:"
73ssh-keygen -L -f "$cert" | sed -n 's/^ *\(Valid:.*\)$/  \1/p; s/^ *\(Key ID:.*\)$/  \1/p'
Set the environment variable BAO_ADDR to the URL of your OpenBao instance
(default: http://localhost:8443), and optionally SSH_KEY to the path of your private key
(default: ~/.ssh/id_ed25519_bao).
To automatically call this script on new ssh sessions, we need to configure the local ssh settings.
Add a host definition to your ~/.ssh/config like so (replace the hostname, keyfile and user with your own):
# ~/.ssh/config

# Define the hosts where you want to use the signed certificate and trigger a generation.
Host remote-host1
  HostName <your host url or ip>
  User <your user>

  # The private key, generate once with `ssh-keygen -t ed25519 -f ~/.ssh/id_ed25519_bao`
  IdentityFile ~/.ssh/id_ed25519_bao

  # The signed public key from the renewal script.
  CertificateFile ~/.ssh/id_ed25519_bao-cert.pub

  # avoids sending other keys to the host on failure.
  IdentitiesOnly yes

  # The automatic renewal of the signed public key before connecting.
  # Adapt the script path accordingly.
  Match exec "test -t 2 && ~/bao-ssh-cert.sh >&2; false"
The magic is the Match exec line that calls the renewal script before connecting.
Principals: who may become whom
A certificate does not create accounts on the remote host. It carries a list of principals: names the CA vouches for. The host then decides which local accounts those names may log into (“Allow”). A principal is something like an abstraction layer between the identity/CA world (Keycloak, OpenBao) and the Linux accounts on the remote hosts.
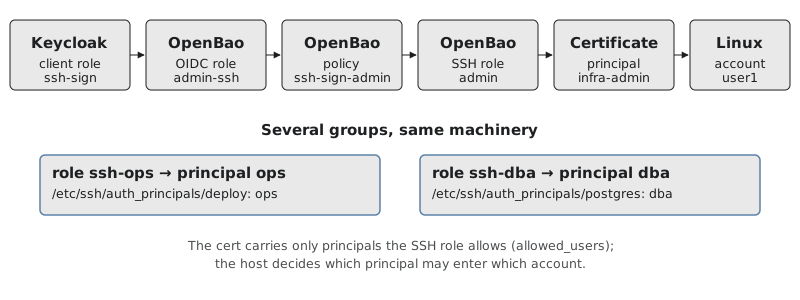
Every layer narrows what the one before may do.
The OpenBao SSH role restricts which principals can be put into a signature at all (
allowed_users). Asking for a principal that is not allowed fails at signing time.The host file
/etc/ssh/auth_principals/<account>lists which principals may log in as that account. A signed key forinfra-adminworks foruser1on the hosts whoseuser1file lists it, and nowhere else.Best practice is that a principal names a role or group (
infra-admin,ops,dba), not a person. The key ID in the certificate records who actually asked, and it shows up in thesshdlog.
On the host, the mapping is one small file per account, referenced by the
AuthorizedPrincipalsFile line from the drop-in above. The file name is the
local account, the content is the list of principals allowed to log in as it:
/etc/ssh/auth_principals/
├── user1      # principals allowed to log in as user1
├── deploy     # principals allowed to log in as deploy
└── root       # principals allowed to log in as root
# /etc/ssh/auth_principals/user1
infra-admin
ops
Logging in as user1 now works with any certificate that contains infra-admin
or ops principals. Different hosts can map the same principal to different accounts, or
not at all. An account without a file cannot be reached with a certificate. The
files decide who gets in, so they should be owned by root and not writable by others.
The key signature says what you are allowed to be, the login name says what you
want to be: you still choose the account yourself (ssh user1@host or User
in ~/.ssh/config), and sshd only checks that the two match. This is a pure
allow mechanism. Without a matching entry in the principals file, nobody gets in
as that account with a certificate, and access is revoked by removing the entry.
Note
Without AuthorizedPrincipalsFile, sshd requires the principal to be
identical to the Unix username. That works, but the CA then has to know the
account names on every host and the abstraction is gone. Also, always set
principals explicitly when signing: a signature without any principals can
be accepted for arbitrary users in some configurations.
What can go wrong
OpenBao sealed or Keycloak down: no new signatures. Existing ones work until they expire and open sessions remain open.
Locking yourself out on the remote host: Test in a second terminal with an active session before switching off
authorized_keys. Make sure that you can access the remote host in case of locking yourself out (e.g. physical access, a console of the Hypervisor or cloud provider).Unattended jobs: a renewal opens a browser for the Keycloak login. Renew by hand before running Ansible or another config management tool.
The end
We have now a working setup with a PKI that allows to log into remote hosts with a signed key, renew signatures automatically and allow/revoke access centrally in Keycloak. The process is scalable and auditable, though it will require adaptions to real world environments.
I hope the goal of this post was achieved: To show the principal mechanisms, the chain of trust, clarify some terminology, give a working example, and show how to connect the dots between OpenBao, Keycloak and OpenSSH.